Chat Supervised Fine-Tuning (SFT)
This guide demonstrates supervised fine-tuning (SFT) on chat-formatted data using a running TuFT server. Full runnable code is in the examples/chat_sft/chat_sft.ipynb notebook. Although this is a general SFT guide, it also documents common issues users may encounter when using TuFT for SFT and provides step-by-step guidance to help them successfully complete an end-to-end run.
What You’ll Learn
How to load chat datasets from HuggingFace and extract multi-turn
messagesHow to format conversations using model chat templates (
apply_chat_template)How to implement assistant-only loss masking and compute masked negative log-likelihood for evaluation
How to construct
Datumobjects and run an end-to-end LoRA SFT loop via TuFT server.How to choose and tune LoRA rank and learning rate based on train/test curves
Table of Contents
When to Use SFT vs. RL
SFT vs. RL (high-level comparison)
Topic |
SFT (Supervised Fine-Tuning) |
RL (Reinforcement Learning) |
|---|---|---|
Training signal |
Demonstrations (target responses) |
Reward / preferences (scalar or ranking) |
Best for |
Style, format, instruction following, domain behavior from curated answers |
Aligning behavior to preferences/constraints, safety policies, multi-objective trade-offs |
Data required |
High-quality assistant responses |
Reward model, preference pairs, or evaluators |
Typical workflow |
Often the first stage |
Often follows SFT (SFT → RL) |
Examples of training data / signal |
Input-output pairs, e.g. prompt: “Rewrite as a polite email …” → target: “Dear … Sincerely …” |
LLM-as-judge: rank A vs B or score responses |
Rule of thumb
Use SFT when you can provide good “gold” assistant responses and want the model to imitate a clear target output.
Use RL when there is no single correct response, but you can define what is “better” via a reward or preference signal, often based on task requirements like helpfulness, safety, style, formatting, or tool-use behavior.
Datasets
This guide uses no_robots.
Dataset |
Source |
Size |
Train On |
Use Case |
|---|---|---|---|---|
|
|
~9.5K train + 500 test |
All assistant messages (masked) |
Quick experiments |
Minimal loader:
from datasets import load_dataset

ds = load_dataset("HuggingFaceH4/no_robots")
train_data = [row["messages"] for row in ds["train"]]
test_data  = [row["messages"] for row in ds["test"]]
Each sample is a list of chat messages:
{"role": "user" | "assistant", "content": "..."}
Minimal Training Example (SFT)
TuFT (Tenant-unified FineTuning) is a multi-tenant system that provides a unified service API for fine-tuning large language models (LLMs). It supports the Tinker service API and can be used with the Tinker SDK. Unlike the Tinker, TuFT can run on local GPUs; the experiments below were conducted on a local 2× NVIDIA A100-SXM4-80GB setup (Driver 550.54.15, CUDA 12.9). Before running the example, follow the Installation Guide to start the TuFT server locally.
Key TuFT calls (full code in examples/chat_sft/chat_sft.ipynb):
import tinker
from tinker import types

service_client = tinker.ServiceClient(base_url="http://localhost:10610", api_key=TINKER_API_KEY)

training_client = service_client.create_lora_training_client(
    base_model=BASE_MODEL,
    rank=LORA_RANK,
    train_mlp=True,
    train_attn=True,
    train_unembed=True,
)

fwdbwd = training_client.forward_backward(datums, loss_fn="cross_entropy").result()
training_client.optim_step(types.AdamParams(learning_rate=LEARNING_RATE)).result()
Key Concepts
Chat Formatting & Templates
We use the base model’s chat template so the prompt follows the same role/marker format seen during training.
text = tokenizer.apply_chat_template(
    messages,
    tokenize=False,
    add_generation_prompt=False,
)
tokens = tokenizer.encode(text, add_special_tokens=False)
tokenize=False: return rendered text (string), not token IDs; we tokenize explicitly in the next line.add_generation_prompt=False: don’t append the final “assistant start” marker; useful for training/encoding existing turns. (For inference, often setTrueto prompt the model to generate the next assistant reply.)add_special_tokens=False: avoid duplicating special tokens since the chat template already includes the needed markers.
Loss Masking (Assistant-only)
For chat SFT, we usually want the model to learn to produce assistant responses, not to predict the user prompt. We therefore build per-token weights:
tokens from assistant turns →
weight = 1.0tokens from user turns →
weight = 0.0
Because training is next-token prediction, the mask must be aligned to the target tokens (the tokens being predicted). If we build weights for the original token stream tokens[0..N-1], then the loss at step t predicts tokens[t+1], so we use weights[1:] to align with target_tokens = tokens[1:].
def build_sft_example(messages, tokenizer, max_length=2048):
    # Build token stream + per-token weights (assistant=1, user=0)
    tokens, weights = [], []
    for msg in messages:
        turn_tokens = tokenizer.encode(msg["content"], add_special_tokens=False)
        tokens += turn_tokens
        weights += [1.0 if msg["role"] == "assistant" else 0.0] * len(turn_tokens)

    # Optional truncation
    tokens, weights = tokens[:max_length], weights[:max_length]

    # Next-token prediction: input[t] -> target[t] = tokens[t+1]
    input_tokens  = tokens[:-1]
    target_tokens = tokens[1:]

    # Align mask to targets (the predicted tokens)
    target_weights = weights[1:]

    return input_tokens, target_tokens, target_weights
Datum Format
Each conversation is converted into a next-token-prediction sample:
model_input: tokens[0..T-2]target_tokens: tokens[1..T-1]weights: mask applied on targets (assistant-only)
Example:
from tinker import types

datum = types.Datum(
    model_input=types.ModelInput.from_ints(input_tokens),
    loss_fn_inputs={
        "target_tokens": list(target_tokens),
        "weights": target_weights.tolist(),
    },
)
Loss Function
Training uses the following loss function:
loss_fn="cross_entropy"
TuFT returns per-token log probabilities (logprobs). The guide computes masked Negative Log-Likelihood (NLL):
Minimal computation:
def masked_nll(loss_fn_outputs, datums):
    total_loss, total_w = 0.0, 0.0
    for out, d in zip(loss_fn_outputs, datums):
        for lp, w in zip(out["logprobs"], d.loss_fn_inputs["weights"]):
            total_loss += -lp * w
            total_w += w
    return total_loss / max(total_w, 1.0)
Parameter Selection
This section explains how to choose lora_rank and learning_rate, and summarizes conclusions from the provided experiment results. This documentation is based on Qwen/Qwen3-4B-Instruct-2507.
What do lora_rank and learning_rate do?
lora_rank (LoRA adapter rank) controls adapter capacity:
Higher rank = more trainable params → potentially better fit, more compute/memory, higher overfitting risk
Lower rank = cheaper, often sufficient for style/small behavior changes
learning_rate controls update step size:
Too high (e.g.
1e-3): fast but can be unstable/overfitToo low (e.g.
1e-5): stable but slowMiddle (e.g.
1e-4): common default for LoRA SFT
Experimental conclusions from the plots
Based on Figure 1 (test NLL) and Figure 2 (train mean NLL):
Very low LR (
1e-5) converges much more slowly1e-4and1e-3improve quickly earlyRank has diminishing returns beyond a point
Best test losses often cluster around moderate rank + moderate/high LR
Note: exact “best” depends on stopping step and downstream generation quality (not only NLL).
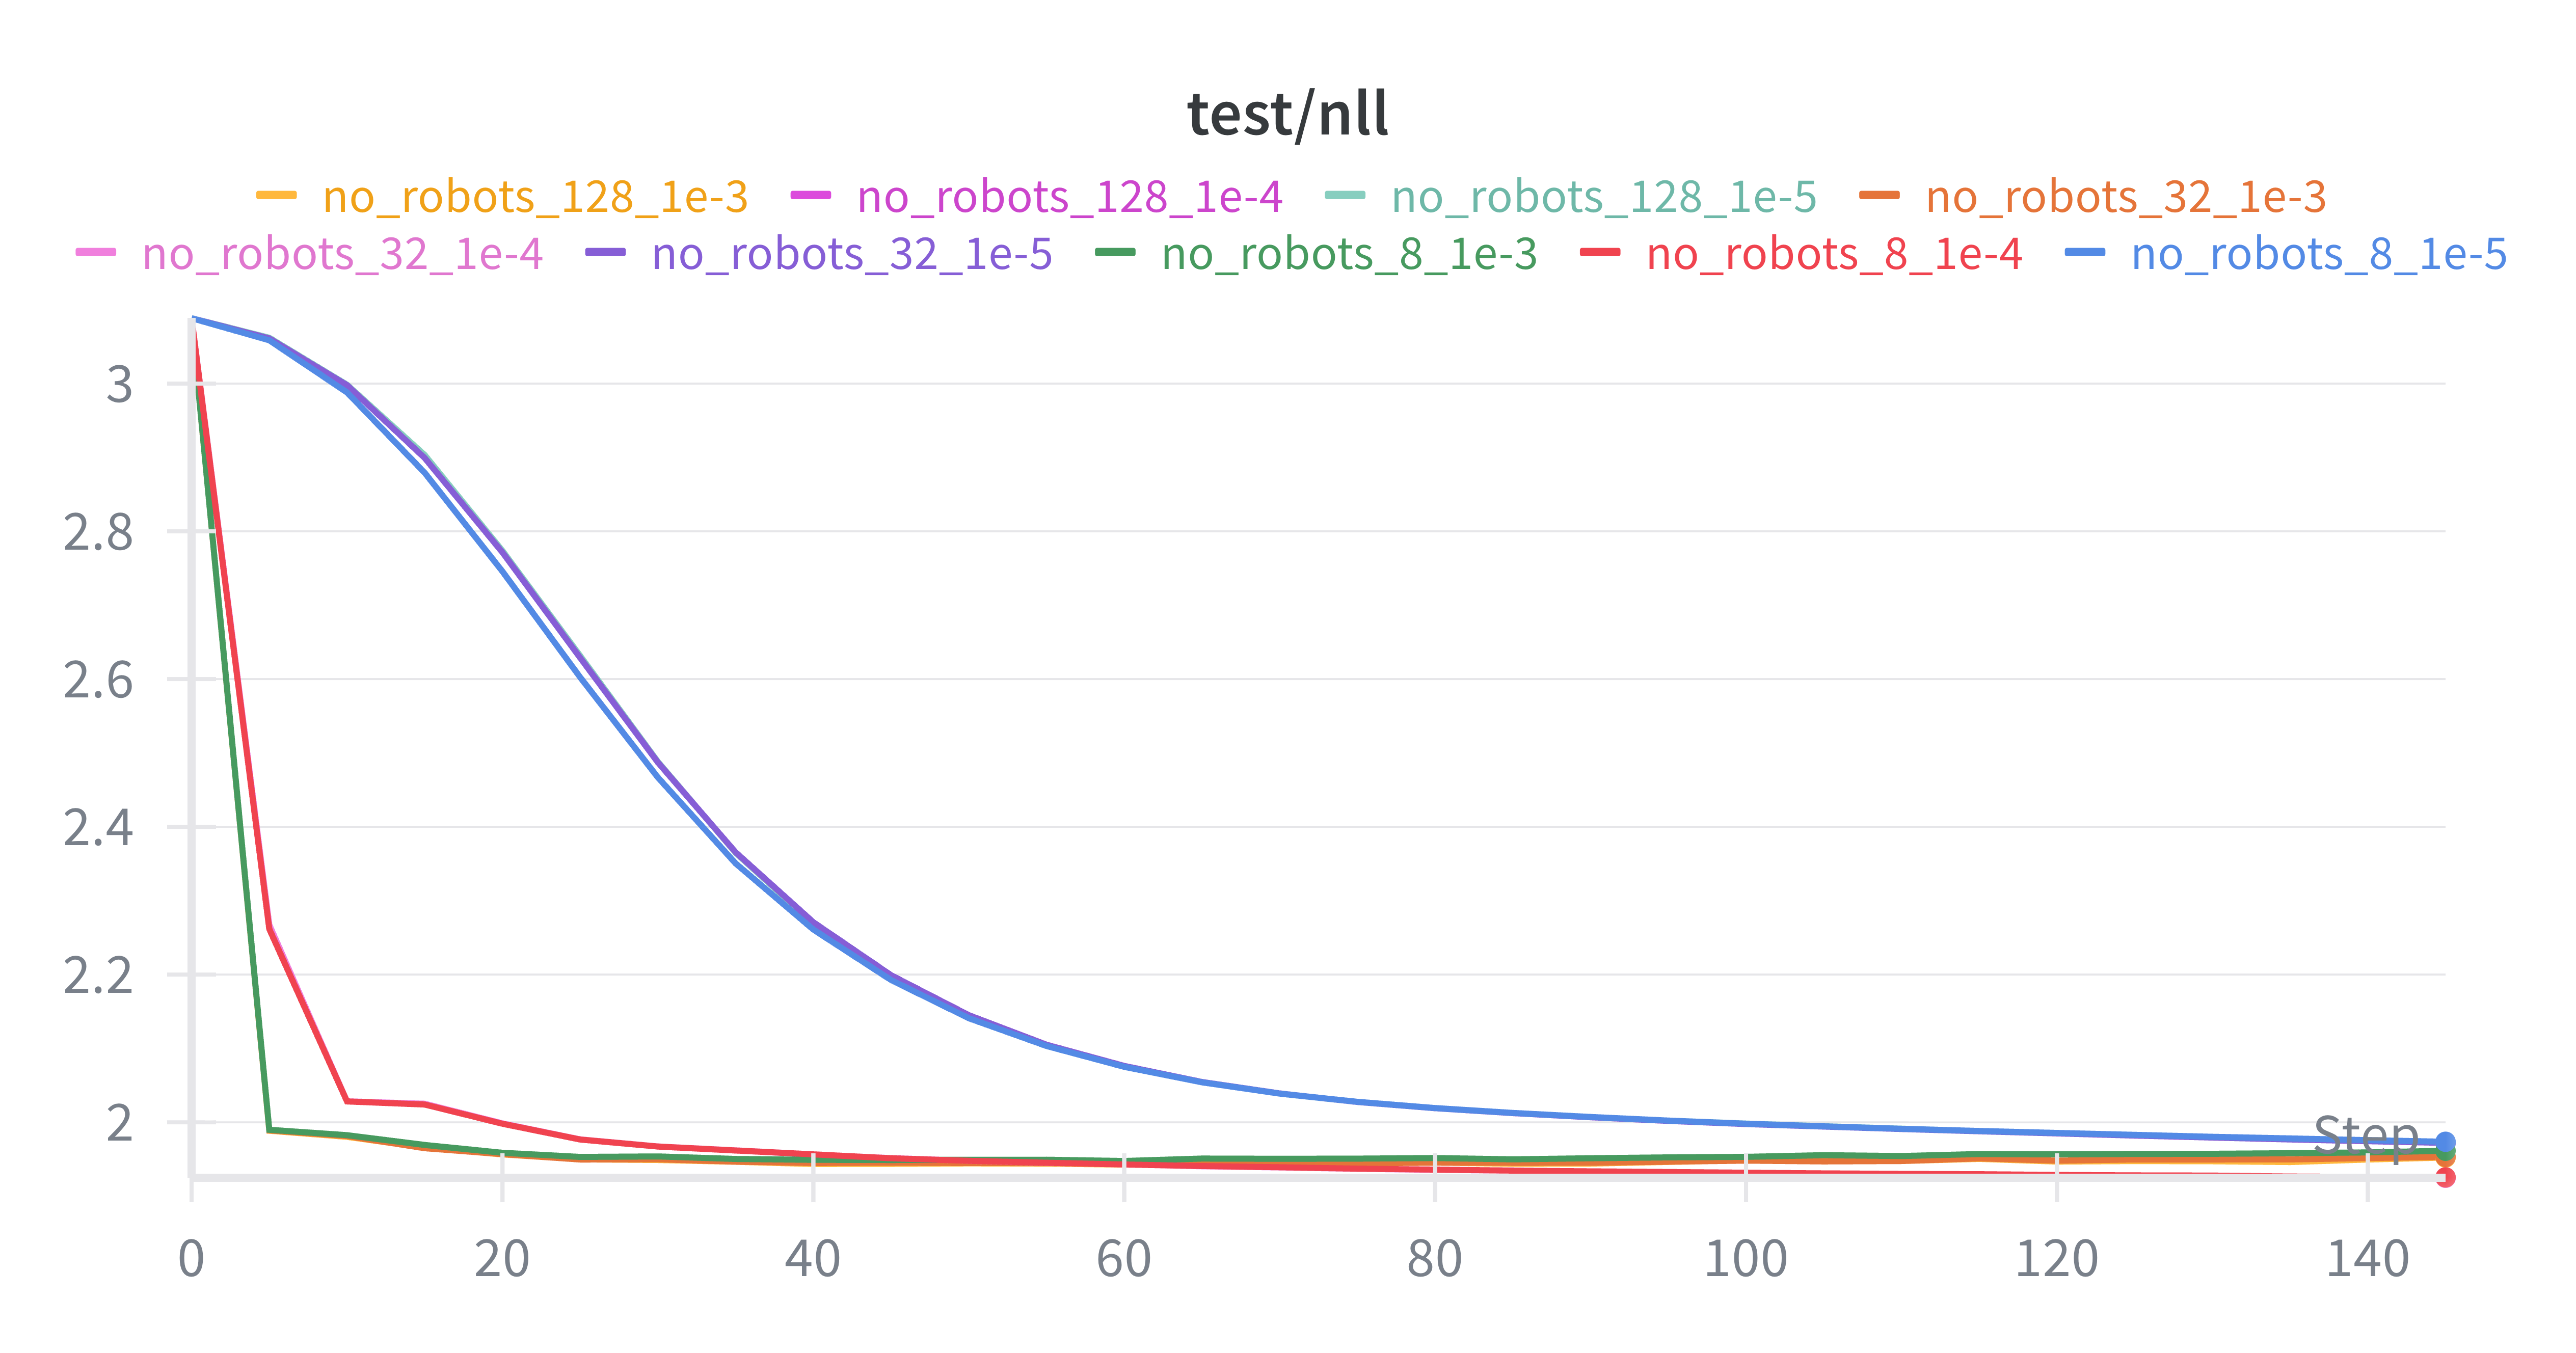
Figure 1. Test NLL
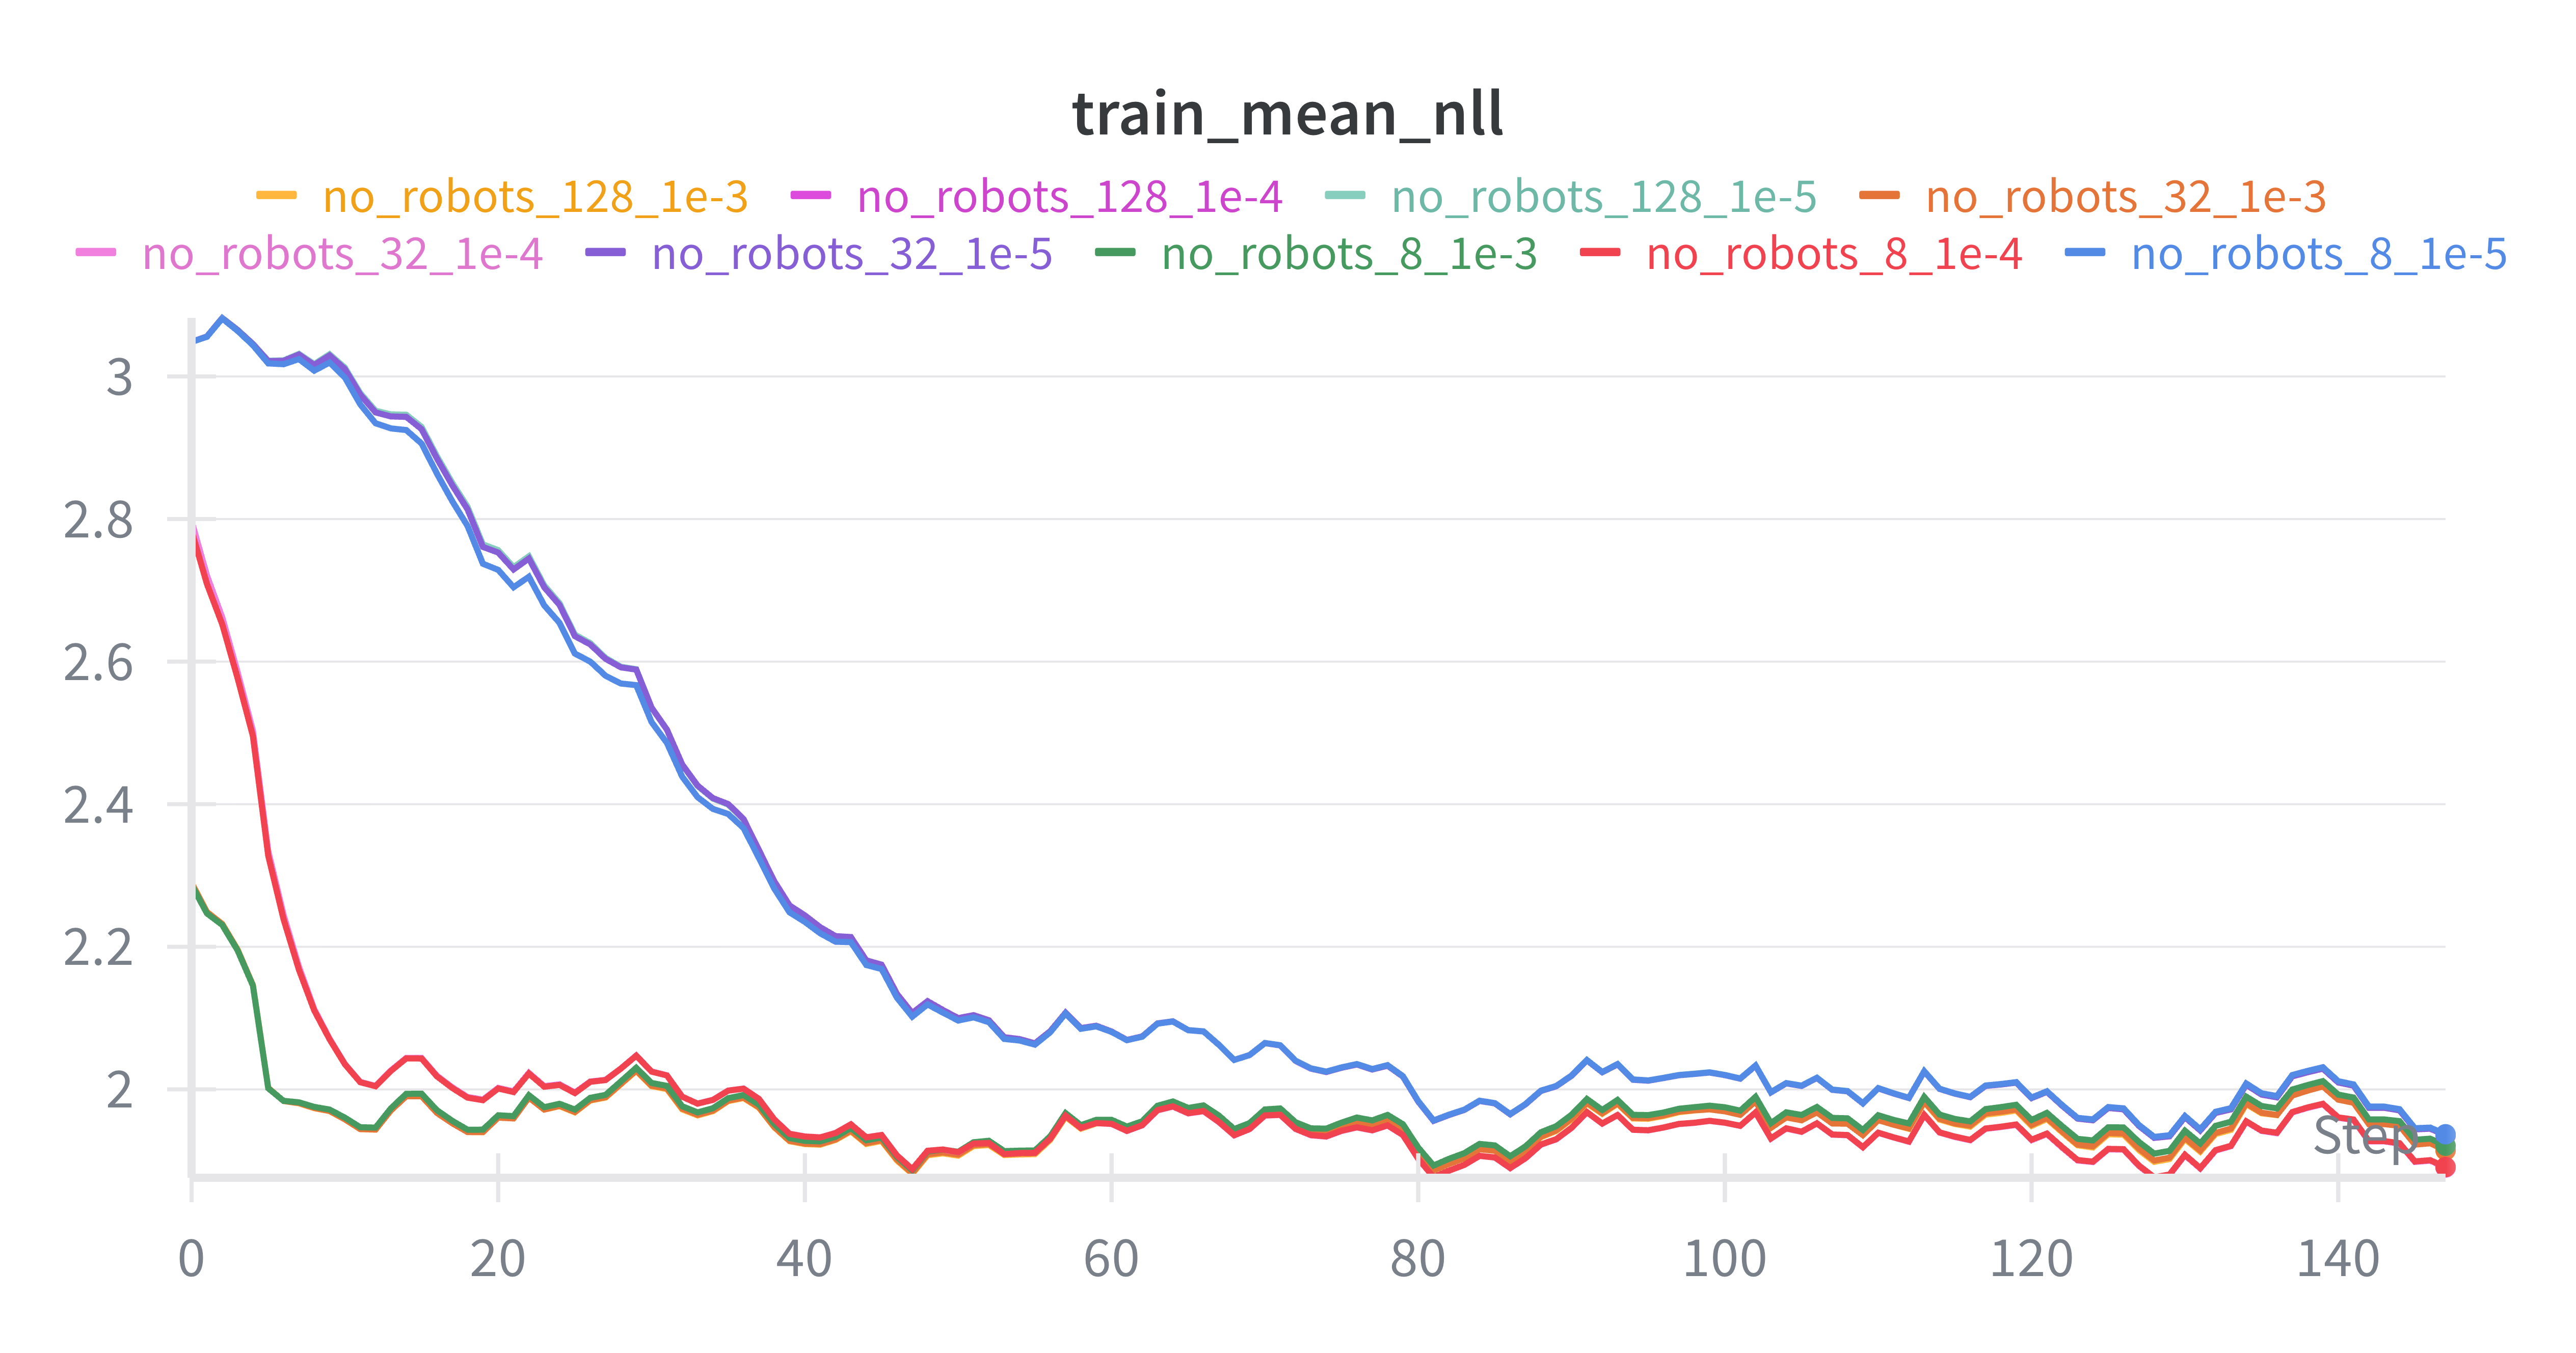
Figure 2. Train mean NLL
Practical recommendations
Strong default:
lora_rank = 8 or 32,learning_rate = 1e-4Faster early progress (riskier):
lora_rank = 8 or 32,learning_rate = 1e-3If unstable/overfitting: lower LR (
1e-4 → 5e-5 → 1e-5) or lower rank (32 → 8)If task is harder: try
32before128, keep LR1e-4, increase steps before rank if possible. “Harder” means the learning problem is intrinsically more difficult (more complex input→output mapping), such as stricter output constraints/format, longer context, more reasoning steps, or higher output diversity/ambiguity. It does not simply mean “more data”; more data usually just requires more training steps, not a higher LoRA rank.
Q&A
(1) Dataset download fails due to network issues when accessing huggingface.co
If you see an error like:
MaxRetryError('HTTPSConnectionPool(host='huggingface.co', port=443): Max retries exceeded ...
(Caused by NewConnectionError(... [Errno 101] Network is unreachable))')
For Jupyter notebook users, add the following at the very top of the first cell:
import os
os.environ["HF_ENDPOINT"] = "https://hf-mirror.com"
Then Restart Kernel and Clear ALL Outputs.
(2) invalid Api_key
In the Tinker SDK, the environment variable TINKER_API_KEY takes precedence over the api_key= argument passed here:
service_client = tinker.ServiceClient(base_url=TINKER_BASE_URL, api_key=TINKER_API_KEY)
So if your code is passing the correct key but you still get invalid api_key, you need to either set the correct environment variable (via export TINKER_API_KEY=...) or clear it and rely on the api_key= argument:
unset TINKER_API_KEY
(3) Jupyter warning: TqdmWarning: IProgress not found...
If you see:
TqdmWarning: IProgress not found. Please update jupyter and ipywidgets.
Option A (recommended): install/upgrade Jupyter widgets
pip install -U ipywidgets jupyter
Then restart the kernel.
Option B: avoid widget-based tqdm in notebooks
Use the standard tqdm progress bar instead of tqdm.auto / tqdm.notebook:
from tqdm import tqdm
(4) OOM or slow training
If you run into out-of-memory (OOM) errors or training is too slow, reduce one or more of:
MAX_LENGTHBATCH_SIZELORA_RANK
In most cases, lowering MAX_LENGTH gives the biggest memory/speed improvement, followed by BATCH_SIZE, then LORA_RANK.
(5) Add a virtual environment to Jupyter (register a new kernel)
If you’re working on a remote server, it’s often convenient to add your existing virtual environment (virtualenv/venv) as a selectable Jupyter kernel.
Activate the virtual environment
source /path/to/venv/bin/activate
Install
ipykernelinside the environment
pip install ipykernel
Register the environment as a Jupyter kernel
python -m ipykernel install --user --name=myproject --display-name "Python (myproject)"
Select the kernel in Jupyter
In Jupyter Notebook/Lab: Kernel → Change Kernel → Python (myproject)